


How to Install Roamvy eSIM on Samsung/Android
Aug. 25, 2025
How-To Guides
With Roamvy, staying connected on Android is simple. You don’t have to worry about complex activation steps — your eSIM activates automatically when you arrive at your destination. All you need to do is install it once, and you’re ready to go.
Here’s how to install your Roamvy eSIM on Samsung, Google Pixel, and other Android devices.
Step 1: Get Your Roamvy eSIM
After purchasing through the Roamvy app or website, your eSIM details are delivered instantly:
- In the Roamvy app (under My eSIMs > View Plans).
- By email, including QR code and manual install details.
Step 2: Install Your Roamvy eSIM
You can install your Roamvy eSIM in three ways:
- Direct from the Roamvy App
- Open the Roamvy app.
- Go to My eSIMs > View Plans.
- Tap Install eSIM and follow the on-screen instructions.
- Scan QR Code
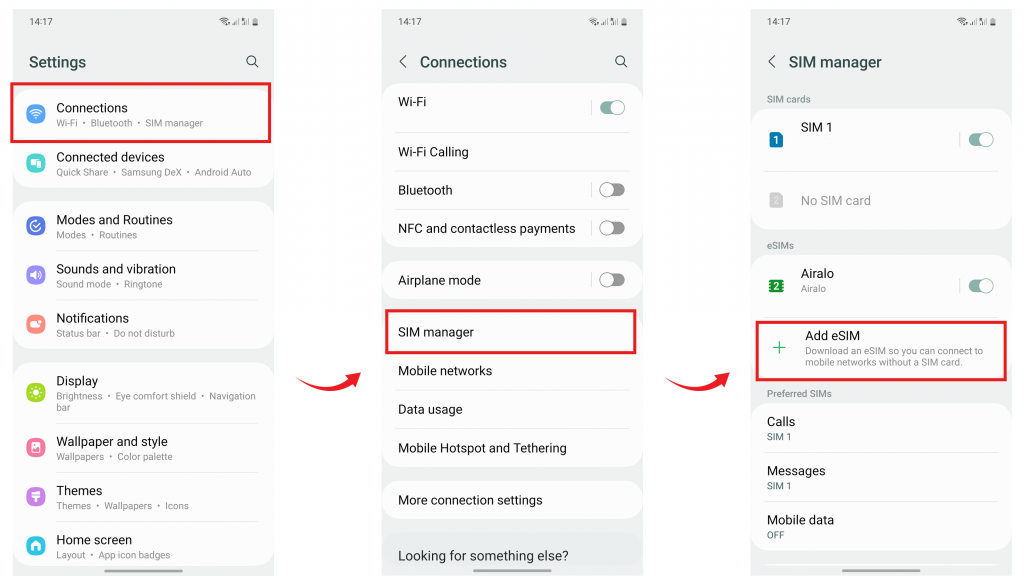
- Open your phone’s Settings.
- Go to Connections > SIM Manager > Add eSIM (Samsung) or
- Settings > Network & Internet > SIMs > Download a SIM instead (Pixel).
- Scan the QR code from your Roamvy email/app.
- Your eSIM profile will install automatically.
- Manual Entry
- Go to your phone’s Settings > Connections > SIM Manager > Add eSIM.
- Choose Enter Details Manually.
- Enter the SM-DP+ address and activation code provided in your Roamvy app/email.
Step 3: Set Roamvy as Your Data Line
- Go to Settings > Connections > SIM Manager.
- Turn on your Roamvy eSIM profile.
- Under Mobile Data, select Roamvy as the preferred SIM.
- Toggle Data Roaming ON.
Step 4: Automatic Activation
- Once installed and data roaming is ON, your Roamvy eSIM will activate automatically when you arrive at your destination.
- Your device will connect to the nearest local partner network instantly.
Step 5: Track Usage & Top Up
- Open the Roamvy app anytime to check your data balance.
- A speedometer-style usage meter shows your remaining data.
- You’ll get notifications at 50%, 80%, and 100% usage.
- Need more data? Tap Top Up in the app and add more instantly.
Why Roamvy Makes It Easy
- eSIMs in 200+ countries. Flexible plans. Instant setup.
- Three installation methods: app, QR code, manual.
- Automatic activation when you land.
- 24/7 support if you need help on the go.
FAQs
Do I need Wi-Fi to install the Roamvy eSIM?
Yes. Wi-Fi or mobile data is required to download the eSIM profile. After installation, Roamvy provides your data connection.
Can I keep my physical SIM for calls?
Yes. Most Android devices support dual SIM, so you can keep your home SIM active while using Roamvy for data.
What if my Roamvy eSIM doesn’t connect automatically?
Restart your device, make sure Data Roaming is enabled, or check APN settings in the Roamvy app.
Final Thoughts
With Roamvy on Android, it only takes a few taps to install your eSIM. After that, activation is automatic when you land — no hassle, no stress. Just smooth, reliable connectivity wherever you travel.
Wherever you roam, stay connected.
Install your Roamvy eSIM on Android today and enjoy instant connectivity on arrival.
Get Started →